Last Updated: October 25, 2026
Quick Summary
To make an accessible renovation work, book a home accessibility assessment with an occupational therapist before you brief any builder, then agree the modifications you actually need in writing. Get the structure right first, plan the accessible bathroom early, and build building regulations compliance into the design from day one.
- An OT assessment checks entrances, circulation, bathrooms, kitchens, bedrooms and stairs, and many councils offer it free or low-cost.
- Aim for internal doorways of around 800mm clear, external doorways around 900mm and a turning circle of around 1500mm.
- Never knock through a wall without a structural survey, as removing a load-bearing wall will fail building control.
- The best bathroom layout is a level-access walk-in shower with no tray lip, plus grab rails on solid walls.
- Keep one usable bathroom and a working kitchen for as long as possible while the build runs.
Table of Contents
- Why Plan Accessibility Before the Build Starts
- Step 1: Book a Home Accessibility Assessment
- Step 2: Agree the Accessible Home Modifications You Actually Need
- Step 3: Get the Structure Right for a Wheelchair Accessible Home Renovation
- Step 4: Plan an Accessible Bathroom Renovation
- Step 5: Choose Flooring, Lighting and Fittings That Last
- Step 6: Meet Building Regulations Without Losing the Finish
- Step 7: Manage the Build Around the People Living in It
- Frequently Asked Questions
Why Plan Accessibility Before the Build Starts
Most renovation regrets start with a decision made too early. Homeowners plan a beautiful new layout, then discover a doorway is 50mm too narrow for a wheelchair. Retrofitting costs far more than building it right the first time.
Planning an accessible renovation from day one is the single biggest saving you will make. It means fewer changes later, less disruption, and a home that works for everyone who lives in it. At FMT Construction, we have spent over 35 years building and altering homes, and the projects that age best are the ones where access was designed in, not bolted on.
Here is the core argument: accessibility is not a medical add-on. It is good design. A step-free entrance, wider doors and a level shower suit a toddler, a delivery driver and a grandparent equally well.
Below, we walk through seven steps to get this right, from the first assessment to the final sign-off.
Step 1: Book a Home Accessibility Assessment
A home accessibility assessment is a professional review of your property that identifies what needs to change to make daily life easier and safer. It looks at how you move through the house now, and what you will need in future.
Book this before you brief any builder. An assessment gives you a clear list of needs, which stops you guessing and overspending.
What an Occupational Therapist Will Look At
An occupational therapist, or OT, focuses on how you actually use each room. They will check:
- Entrances: step heights, door widths, and whether a ramp or level threshold is needed
- Circulation: hallway widths and turning space for a wheelchair or walking frame
- Bathrooms: access to the bath or shower, and space for rails and a seat
- Kitchens: worktop heights and reach distances
- Bedrooms: space to move around the bed and store items safely
- Stairs: whether a lift, stairlift or ground-floor bedroom is the better option
Many local councils offer a free or low-cost OT assessment for residents with a disability or long-term condition. Ask your council's adult social care team what is available. The findings become your brief, so share them with your builder early.
Step 2: Agree the Accessible Home Modifications You Actually Need
Accessible home modifications are the physical changes that remove barriers in your home. They range from grab rails and ramps to widened doorways and a level-access shower.
Not every home needs every change. The trick is matching modifications to the people who live there, and to what your budget can cover. A common mistake is copying a generic checklist instead of working from your OT report.
Doorway Widths, Thresholds and Turning Circles
These three measurements decide whether a wheelchair user can move freely. Get them wrong and the whole renovation suffers.
| Feature | What to Aim For | Why It Matters |
|---|---|---|
| Internal doorway width | Clear opening of around 800mm or more | Lets most wheelchairs and walkers pass |
| External doorway width | Clear opening of around 900mm | Handles wheelchairs and easier entry |
| Threshold height | Level, or a gentle ramp | Removes trip hazards and wheel snags |
| Turning circle | Around 1500mm clear space | Allows a wheelchair to turn |
| Hallway width | Around 1200mm where possible | Keeps routes usable |
These are working figures, not fixed rules. Your OT report and building control will confirm what suits your property. Agree the final list in writing before work starts.
Step 3: Get the Structure Right for a Wheelchair Accessible Home Renovation
A wheelchair accessible home renovation often hinges on structure. Widening a doorway or opening up a hallway can mean altering load-bearing walls, and that is where projects go wrong.
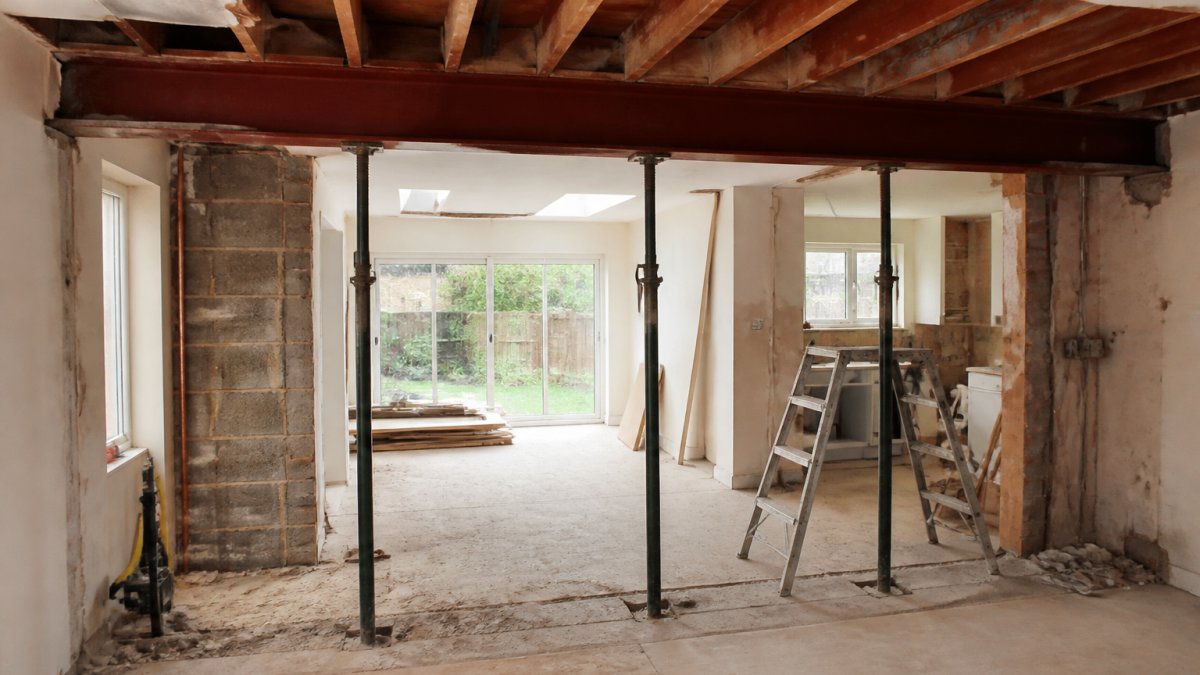
The structure must be right before any finishes go on. A steel beam fitted correctly keeps the building safe and lets you create the open, step-free routes you need.
Watch out: never let anyone knock through a wall without a structural survey. Removing a load-bearing wall without proper support is dangerous and will fail building control.
If your plans include widened openings or a knock-through, it helps to see the structural side handled by a team that does this every day. You can review structural alterations across Surrey to see how steel beams and load-bearing changes are managed safely to building regs.
Step 4: Plan an Accessible Bathroom Renovation
An accessible bathroom renovation is usually the most valuable change in the whole project. The bathroom is where most falls happen, and where access matters most.
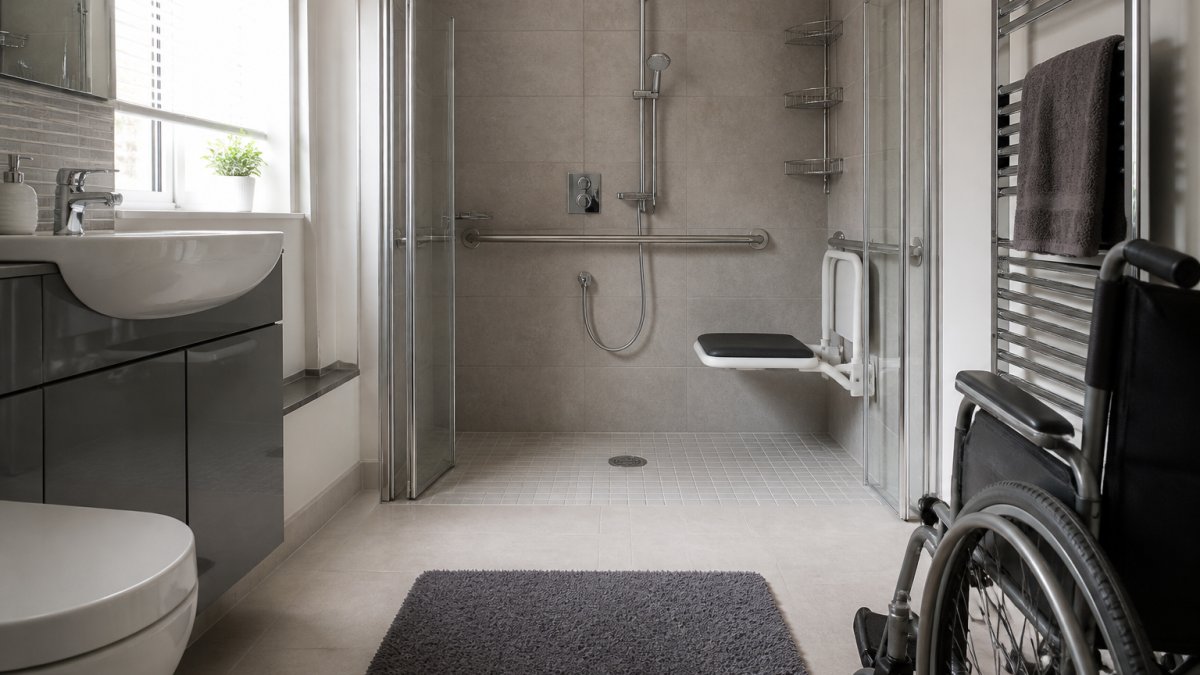
The best layout is a level-access walk-in shower with no tray lip to step over. Add grab rails fixed to solid walls, a wall-hung basin with clear space underneath, and a comfort-height toilet.
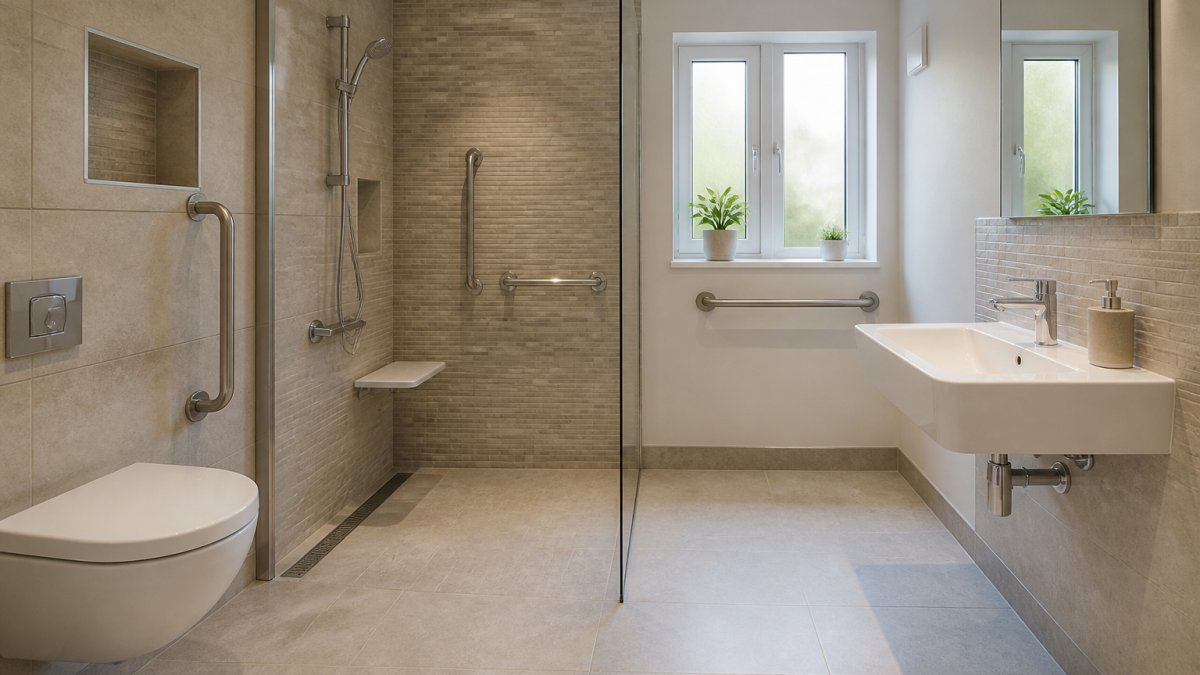
Plan the drainage and waterproofing first. A wet room floor needs the right fall and tanking, or you will get leaks. A common mistake is choosing tiles before the drainage is set, which limits your options later.
For bathrooms and wider whole-house updates, it pays to work with one team. You can explore home refurbishments across Surrey to see how kitchens, bathrooms and full updates are handled together.
Step 5: Choose Flooring, Lighting and Fittings That Last
Flooring and lighting are where accessibility meets everyday comfort. The right choices reduce slips and make the home easier to use for years.
Go for low-slip, hard-wearing flooring in wet areas. Avoid deep-pile carpet and loose rugs, which catch wheels and cause trips. Keep floor levels flush between rooms.
Lighting matters more than most people expect:
- Use bright, even light in hallways and on stairs
- Add motion-sensor lights for night-time trips
- Fit lever taps and door handles rather than twist fittings
- Choose contrast colours so steps and edges stand out
Pick fittings that will still work in ten years. Cheap handles and rails fail, and replacing them means re-drilling and re-finishing.
Step 6: Meet Building Regulations Without Losing the Finish
Building regulations approval is a legal requirement for most structural and access changes. It covers structure, fire safety, drainage and energy performance, and it protects you as much as the next owner.
The trick is to build compliance into the design, not bolt it on at the end. A good builder plans the inspections from day one, so you are not forced into ugly fixes late on.
Watch out: skipping or rushing building control sign-off can mean the work has to be redone. It can also cause problems when you sell.
If you have questions about approvals or living through the work, the answers to common questions about extensions and regulations cover planning permission, building regs and what to expect on site.
Step 7: Manage the Build Around the People Living in It
Most accessible renovations happen while someone still lives in the home. Managing the build well is what separates a smooth project from months of chaos.
Set clear expectations before work starts. Agree a written schedule, a single point of contact, and a daily routine for dust, noise and access. Keep one usable bathroom and a working kitchen for as long as possible.
The thing nobody tells you about accessible builds is that the sequencing matters most. Wet trades, structural work and the accessible bathroom should be planned so you are never without a working facility.
You can see how a building project is run from first visit to final sign-off to understand the process. And if timelines worry you, this guide on how to ensure builders stick to timelines gives practical ways to hold a contractor to the schedule.
Frequently Asked Questions
How wide should doorways be for wheelchair access?
As a working minimum, aim for a clear opening of 800mm, and 850mm or more where a wheelchair user will pass through regularly. The clear opening is the space between the door face and the frame when the door is open, not the frame width, so a 762mm door leaf rarely gives you enough. If you are widening openings during an accessible renovation, do it before plastering and skirting go back on, as retrofitting later costs far more.
Should I consult an occupational therapist before an accessible renovation?
Yes, and do it before drawings are finalised. An occupational therapist assesses how the person actually moves around the home and can recommend specific adaptations, from grab rail positions to shower type, that a builder cannot judge for you. Their recommendations feed directly into your home accessibility assessment and reduce the risk of expensive changes mid-build. Ask your local authority adult social care team about an assessment, or commission one privately.
What is the best flooring for an accessible home?
Level, firm and low-shine surfaces work best: luxury vinyl tile, porcelain or non-slip safety vinyl. Carpet adds rolling resistance for wheelchair users and trip risk for anyone using a stick, and deep pile is the worst offender. Keep transitions between rooms flush, and avoid loose rugs or mats entirely. If you want a timber look, choose a glued-down plank rather than floating boards, which can lift at the edges.
How do I make a bathroom renovation more accessible without it looking clinical?
Specify wet-room-style level access, a wall-hung basin and a comfort-height WC, then finish them in the same tiles and brassware as the rest of the room. Grab rails come in finishes that match towel rails, and a fold-down shower seat can be recessed so it is barely visible when folded. Plan the drainage falls and reinforcement for rails at first fix, because adding them after tiling means stripping the room back.
Making a home genuinely accessible takes planning, the right structure and a builder who understands both. FMT Construction brings over 35 years of practical experience to complex structural alterations, bespoke solutions and safe, solid construction standards. We deliver flawless, high-quality finishes and exceptional living spaces built to last. Get started with FMT Construction and create a home that works for everyone who lives in it.